Automating workflows
Ever needed to extract similar data from different flight dates or fields? Here, we will break down how to automate many of these processing steps using QGIS’s Python console… no previous Python experience required!
Here, we will cover:
- An example script
- How to troubleshoot any issues
- How to customize your own scripts
Part 1. Example Script
An example script and example data can be found here:
https://plantsciencedronemethods.github.io/pages/ExampleData/ExampleData.html
The script covers many of the steps previously covered in
these tutorials, and will:
- Make a masking layer based on an NDVI threshold of 0.5,
- Use that to make a masked NDVI layer, just NDVI of plants, no soil,
- Make a canopy digital surface model
- Make a soil digital surface model
- Generate zonal statistics and print them to CSVs (which can be read into R, opened in Excel, etc.)
It is set up so that files are “named” once (given a name as a variable), then later through the processing, those same names are recycled repeatedly. That means that you can just update the names of your files once each, not all over the place through the code! Much faster and easier for repeated flight dates/locations!
To run the script:
- Put the example script, an NDVI file, a DSM, and a plot grid gpkg into one folder (all of these are provided in the example data page above, or you can use your own files!)
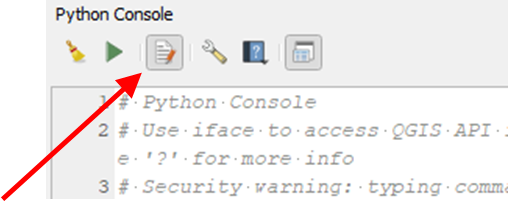
- In QGIS, click Plugins --> Python Console, then in the panel at bottom, click the Show Editor symbol
- In the new Editor pane, click the “Open script” symbol , then open the example script you just downloaded. Alternatively, you could just type or paste some new code in that script panel.
- In the example script, in the “folder = ”... line, update your path so that it directs to the location of your files.
- If you are working with your own data, re-specify the names of each of those files in the “# Set your working files” section. By default, those are the names of the working files.
- After any changes, click the save symbol (or Ctrl+S on a PC).
- Load your NDVI, DSM, and plot grid geopackage into QGIS (just drag and drop, if not previously dones).
- Click the green play symbol for Run Command. Processing should be done within a minute, typically!
- The results should be written to CSV files in your working directory. Always check each of the outputs in QGIS. Automating this stuff is no excuse for sloppiness! But hopefully it saves a lot of time on the clicking, entering equations, etc!

Part 2. Troubleshooting
Sometimes, this won’t work out on the first try. That is okay, it happens! Here are a few thoughts on troubleshooting:
- Carefully read the error messages. Sometimes they will refer to lines of code in the functions themselves, rather than your script
- For confusing error messages, consider running the code in chunks, to see how far it gets before failing
- Always remove outputs from layers panel before re-running script, and close any open files like CSV outputs that maybe you opened to check in Excel, for example
- Always be very careful when editing scripts. These things can be very finicky… for example, be careful to include the suffixes of your files (like “.tif”) and leave the quotes. I don’t recommend editing in Word, Google Docs, etc., instead use the Python Console. E.g., curly quotes are the default in some applications, they can make this fail, so use the Python console, and/or copy and paste
- On a Mac, the colon symbol in path names is problematic when routing file name. Avoid special characters in file names, and have specific naming convention to keep dates in check
- Still at a loss? AI tools (e.g., ChatGPT) are helpful for debugging
Part 3. Custom scripts
The Processing Toolbox (View → Panels → Processing Toolbox) has awesome options for really easily pulling out the Python script from any function! Try it out!
Important note: Some functions can be accessed from
the Toolbar or the Processing Toolbox. For example, notice the difference in the Raster Calculator interface
when accessed from Raster → Raster Calculator vs. searching in the Processing Toolbox. Let’s use
the Processing Toolbox for this!
- Open your function from the Processing Toolbox.
- Plug in any values for inputs, outputs, parameters, etc. that you might be interested in.
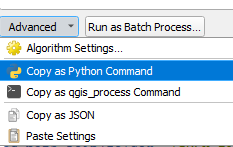
- When you are just about ready to run the code, click the “Advanced” option at the bottom (again… only available if the function was opened from the Processing Toolbox). Then click “Copy as Python Command”.
- Open the Python Script Editor if not already done
- Plugins → Python Console, then click the “Show editor” symbol in the new window

- Paste the code. It will probably all be on one line. It can be
helpful, but not necessary, to make it visually more clear by giving line breaks for each individual
expression within the line of code.
Before:
processing.run("native:rastercalc", {'LAYERS':['E:/drone stuff/2024-09-06 limas REM_index_ndvi.tif'],'EXPRESSION':'"2024-09-06 limas REM_index_ndvi@1" > 0.5','EXTENT':None,'CELL_SIZE':None,'CRS':None,'OUTPUT':'C:/Users/trparker/Desktop/QGIS 2024 lima/2024-09-06/thresh2.tif'})
After:
processing.run("native:rastercalc", {
'LAYERS':['E:/drone stuff/2024-09-06 limas REM_index_ndvi.tif'],
'EXPRESSION':'"2024-09-06 limas REM_index_ndvi@1" > 0.5',
'EXTENT':None,
'CELL_SIZE':None,
'CRS':None,
'OUTPUT':'C:/Users/trparker/Desktop/QGIS 2024 lima/2024-09-06/thresh.tif'
})
- This would be fine and work, but if you want to do this on lots of flight dates, you might notice that your “Layers”, “Expression”, and “Output” lines are giving very precise file names. They would therefore need to be updated for every flight date. Especially if you are doing many processing steps, it is best to not have to go through and rename every file in every step of the processing. So especially for long and multi-step processes, it can be helpful to rename files and folders as variable names. That way, you can specify the file name once, then refer to it repeatedly throughout the later steps.
- Example of making a variable name for a folder… I often
will have all my images from one flight date in a single folder, then just re-specify the name of the
folder once per flight date, plus possibly updating a few key file names:
folder = 'E:/drone stuff/'
This can then be referred back to as “folder” in subsequent processing steps.
- Example for a file in “folder” above:
ndvi_file = os.path.join(folder, '2024-09-06
limas REM_index_ndvi.tif')
- If we want to run the raster calculator on this, we could
prepare an quick equation and output file variable:
expression1 = f'"{os.path.splitext(os.path.basename(ndvi_file))[0]}@1" > 0.5'
thresh_file = os.path.join(folder, 'thresh.tif')
(notice that the expression is stripping off the .tif at the end of that file)
- Now let’s run this badboy…
processing.run("native:rastercalc", {
'LAYERS':[ndvi_file],
'EXPRESSION':expression1,
'EXTENT':None,
'CELL_SIZE':None,
'CRS':None,
'OUTPUT':thresh_file
})
- You can keep stacking up later processing steps referring to these same variable names, and they can be used over and over!
- Stack these together, and save as your own Python Script!